Aleriona's passions are about all the things that interest me. I love my minimalist bullet journal that keeps me organised, I enjoy cooking, especially combining my Greek and Swiss influences and I try to spend any free time I have crocheting, reading books or travelling. My blog is diverse and I try to explain how things are done, in case you want to reproduce them. Enjoy!
Our kittens are our princesses at home. I try to make games for them and give them treats from time to time, especially when they return fast in the evening when I call them or when I want to teach them something. There are a lot of treats and snacks available, but I decided to try making some of my own too, especially since I can arrange how much meat they include and how much flour.
For the treats you need:
chicken breast cut in pieces
a tea spoon of catnip (if you want)
a spoon of flour
an egg
The ingredients needed
Start with frying the chicken with a bit of oil and set it a bit aside so that it cools.
When the chicken is cooled down, preheat the oven to 180 C in the air fuction.
Add all the ingredients in a hand blender and create a paste. Empty the paste on baking paper and roll it about 0.5 cm thick,
Cut it in squares using a sharp knive or a pizza cutter.
The paste rolled out and cut. Once baked I cut it to even smaller pieces.
Bake it in the oven for 15 min until it gets a bit of browned edges.
I let it cool down and cut the pieces even smaller. I store the treats in the fridge and especially Aria loved them!
We are currently during the 6th week of the Crafts Marathon I am following this summer. This week’s task is to create something cool for the warm summers. The idea comes from the original creator of the Summer Crafts Marathon, In my closet herself! And for this week, I prepared a rather fast frozen fruits frappé. It is something between a sorbet and a frappé, really.
Apricot – Banana frappé
But let me start with the ingredients. For two portions you will need:
1 banana
2 apricots
1 spoon of lemon juice
50 ml almond milk
2 Tbsp liquid honey or according to will
some raspeberries and blueberries for decoration
Cut the banana and the apricots in pieces and freeze them overnight, paying attention that they do not stick together.
The ingredients needed for 4 portions
The fruits ready to go to the freezer
The next day, take the fruits out of the freezer, let them defrost for 7 to 10 minutes and put them in a blender together with the lemon juice, the almond milk and the honey. You can use as much as honey as you prefer, depending on the sweetness of the fruits too.
All the ingredients together
Blend them all together until they are homogenised and serve them in a bowl decorating them with a few blueberries and raspberries. Eat with a spoon as long as it is still frozen!
This year my husband and I decided to create our own urban garden. I have talked about it a lot in my bullet journal, but it is about time to start mentioning it in my cooking folder too 🙂
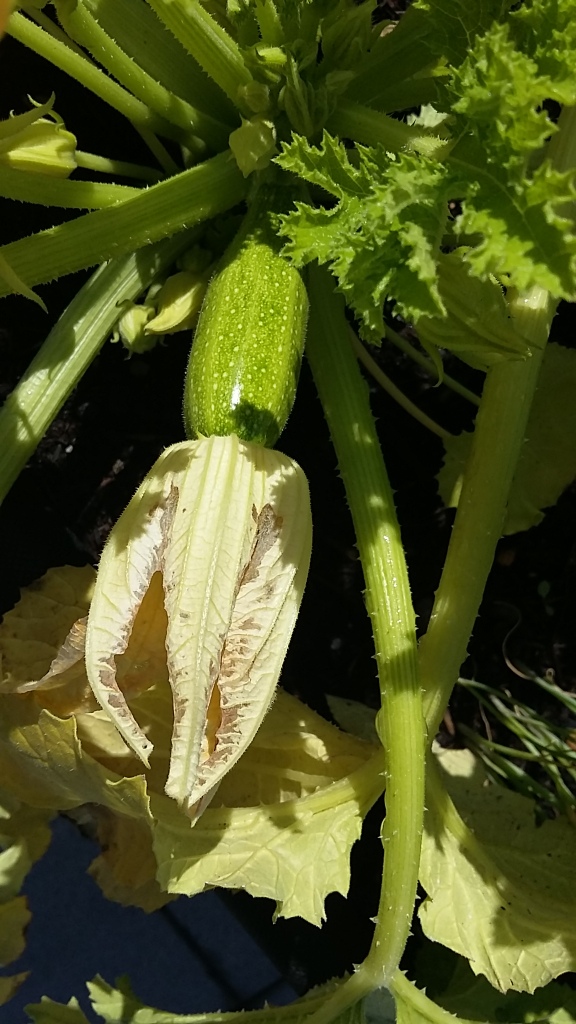
This week our zucchini plants are blooming a lot! In case you don’t know zucchini plants have two types of flowers: male and female. The female ones are at the top of the baby zucchinis, while the male ones are only flowers without any vegetable on the bottom. Currently our plants have really a lot of male flowers and they look so nice, so I wanted to cook something with them.
Male flowers
Female flowers attached to the zucchini
In Greece there are several ways to cook zucchini flowers: you can boil them and have them as salade with a bit of oil and lemon, or you can dip them in dough and fry them, or you can fill them with rice or cheese and bake them or fry them. My mom used to make them the first way, which is the healthiest too. But it would have been the first time for me to cook them at home, so I decided to use only a few flowers together with something else, before diving to deep waters and cook a full dish with them. I then remembered that I had an amazing pizza during a trip in Rome. It was a zucchini and zucchini flower pizza! And I decided to make a pizza with them.
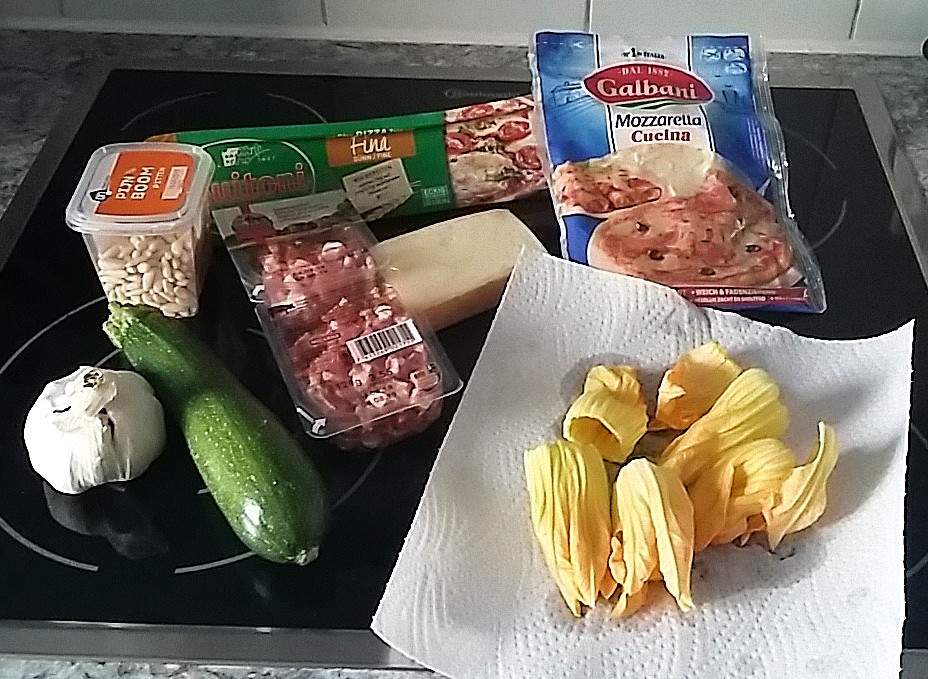
Here are the ingredients I used for the pizza:
a package of pizza dough (of course you can make your own dough too)
130 g bacon cubes
2 garlic cloves, finely cut
1 small to medium zucchini sliced
8 zucchini flowers
150 g grated mozzarella
200 g taleggio cheese (or something similar)
pepper
chili flakes
a handful of pine nuts
Let’s start with the dough. I do not make my own dough, as I usually decide about making a pizza too late to prepare a dough myself. But you can always make your own if you want.
Peel the garlic and cut it finely or press it. Wash the zucchini and cut it in thin slices with the help of a slicer.
Concerning the flowers, I collected only male ones from my plant. But maybe you find only female ones if you buy them. In any case, remove the stalks and the stamens, as these parts taste usually bitter. What remains is the actual petals of the flower.
Begin by preheating the oven at 180 C in the air function. Then saut the bacon cubes without oil or butter until they are a bit brown and towards the end add the garlic.
Spread your pizza dough on top of the tray it will be cooked and scatter firstly grated mozzarella and then the taleggio cheese cut in pieces with the hands. As it is a white pizza and I know that zucchini flowers do not give a lot of flavour, I wanted to add something that has a bit of stronger taste: taleggio cheese. It is a semi-soft cow milk-based cheese with a strong taste. It is a bit milder than green cheese, but still stronger than average soft and semi-soft cheeses. You can add any kind of cheese you prefer, but as mozzarella doesn’t add in the taste a lot, choose something tasty that you like.
Place the sliced zucchini evenly over the cheese. If you have enough make them overlap a bit, as they shrink while baking. Then add the sauted bacon and the flowers.
Sprinkle the pizza with pepper, a few chilly flakes and a handful of pine nuts. I added only a little bit of salt, as the cheeses are salty enough. You can skip it totally if you prefer and according to the cheese types you have used.
Bake the pizza in the preheated oven for 10 to 12 minutes, until the crust is lightly browned.
The pizza assembled and before cookingThe pizza cooked!
It is this period of the year again! I love rhubarb, so it was time to make my annual rhubarb jams.
Last year I combined banana and rhubarb and it was liked a lot, so I decided to make it again. This recipe you can find here.
But I wanted to experiment a bit too. Thanks to a dessert recipe that I found in a local magazine, I tried the combination of strawberry with rhubarb, so why not use it for a jam too!
Rhubarb, Strawberries (I forgot to make a photo before mashing them) and jam sugar. This is all you need!
I used the following ingredients:
1 kg rhubarb
1 kg strawberries
1 kg jam sugar
The first step is to peel the rhubarb and cut it in small pieces. Add it in a pot with 200 mL water and let it boil until it becomes like mashed. This is why it is important to peel it first. If the peel remains, there will still be pieces inside. Without the peel we lose the red colour, but that will be compensated by adding strawberries.
Then remove the green part from the strawberries and mash them with the appropriate tool. At the end add the sugar to the strawberries and mix. Add this mixture to the cooked rhubarb and let it boil for 4 to 6 minutes while mixing. To be sure it is ready, do the jam check: drop a small quantity in a clean plate and let it cool for a minute or two. Once it is cooled it should be viscous enough. You can see an example of the jam check in this post.
In the meanwhile, you should add warm water in a pot and insert the jars you are going to use. It is better not to leave the caps too long in boiling water, as they have a plastic layer in the inside. Remove the jars just before filling them with jam, fill them, cap them tightly and turn them around. This way the jam will be air tight and can be stored in a cool place before opening.
It is a nice, moderately sweet jam. It smells strongly of fresh fruits and we enjoyed it a lot!
I have been thinking of writing this recipe for quite some time, but couldn’t get myself to sit down and do it. This is another interesting speciment of the Swiss cuisine. Contrary to the Wurstsalat I published a few months ago, Älplermagronen is served as main dish and quite often in the small restaurants that you can find up in the Alps or around. Its name means anyway Alp Pasta.
Älplermagronen served!
It is a pasta based gratin and although it looks heavy, it is less than its equivalent ones, as it does not contain heavy cream, but semi-skimmed milk! On the drawbacks, it does take a little bit of time to cook it, but the taste totally rewards the effort!
For 4 big portions, the ingredients needed are:
2 spoons butter for frying
500 g onions in slices
1/2 dl white wine
1/2 dl meat broth
200g fast cooking potatoes
500g pasta (Älplermagronen)
1 lt Milk (any type you like)
3/4 ts Salt
grated Gruyère cheese
150 g bacon in slices
All the ingredients
It is better to start with the onions. Add the butter in a frying pan and once it is hot, add the sliced onions. Reduce the heat to medium and let them fry until light brown for about 30 min. Then add white wine and meat broth, let reach boiling point and mix until all humidity is gone. Put it aside for later.
In the meanwhile prepare the pasta. In Switzerland they use the appropriate type of pasta, called (surprise, surprise) Älpler Μagronen. They are egg pasta, thicker and shorter than spaghetti, but thinner than penne. Unfortunately, I am not sure you can find exactly these ones anywhere else but here. Nevertheless, you can use another type of pasta, as long as it is not too small. Penne or fusilli could be a replacement, but not good enough for Swiss people, so don’t tell them.
The correct type of pasta used for this dish
Traditionally, pasta was being mixed with potatoes, as the latter were cheaper and in abudance. If you check other recipes of Älplermagronen you will find higher portions of potatoes than pasta. But potatoes and pasta do not have the same cooking time. This is important, because if potatoes are in too big pieces, they will not cook in the time that pasta needs. It is a common mistake to have hard pieces of potatoes among the pasta. As a result, in my own version, I have reduced the quantity of fast-cooking potatoes vs pasta, and I pay attention to cut them in really small cubes. It takes a bit more time, I know, but who wants to eat half cooked potatoes?
So back to the preparation, cut the potatoes in small cubes, add them to a big pot together with the pasta, the milk and a bit of salt and let everything cook while mixing, until the pasta is al dente. This is the secret of Älplermagronen: the pasta is cooked in milk. You can use any normal milk you have at home. I use half-skimmed milk and it works perfectly. It is important that the liquid is mostly covering the potato-pasta mixture and mix them, as milk thickens fast thanks to their starch.
Cook the pasta and the potatoes in cubes with milk and not water!
Once the pasta is al dente, add to the mixture the onions you prepared before, grated Gryère and the slices of bacon that you have cut in about 2cm thick stripes. Mix everything together well and pour it in a pyrex or oven-safe tray. Sprinkle with a bit more cheese and put a few thin slices of butter on top. This you cook for about a quarter in the middle of a pre-heated oven at 180 C, until there is a nicely golden crust on the top.
Ready to go in the oven
As with any kind of gratin, it is easier to serve Älplermagronen, when it has colled down a bit. The pieces are not breaking so much. In Switzerland it is served with a bit of apple compote that you add at the side of your plate and mix it with your pasta. Personally, I do not like it with the apple compote. Älplermagronen tastes perfectly even without it!
We are close to Christmas and everybody is preparing for the season. Have you already decorated your Christmas tree? We are not going to have any, as we have kittens around. Nevertheless, it doesn’t have to be less Christmas for us, so yesterday I decided to prepare my favourite Greek Christmas treat: melomakarona
My melomakarona. I decided to make them in stars this year, instead of egg-shaped.
Melomakarona are traditionally egg-shaped and dipped in syrup. It is a totally vegan sweet. It does not include any milk or egg or butter. On the contrary it is based on olive oil. I have tried several recipes of them over the past years, even the one from my favourite chef Akis Petretzikis, but I am sorry Akis, I didn’t like them. By now I have my own recipe and I decided to share it with you.
For about 90 pieces you will need:
340 ml olive oil
110 g margarine
200 g sugar
juice from two oranges
2 tsp orange zest
60 ml cognac
2 tsp baking powder
1 tsp baking soda
1 kg flour
spices (cinnamon, nutmeg, allspice, clover or a mixture of them, such as speculaas or mixed spices)
some ground walnuts for decoration
For the syrup you will need :
1.5 cups honey
1.5 cups sugar
1.5 cups water
It is better to start from the syrup, as it should be cool by the time the melomakarona will be ready. My mom was saying one should be cold and one should be warm, in order for the melomakarona to absorb the syrup inside and be a bit crunchy outside.
You add in equal volumes of honey, sugar and water and you let it start boiling. You should pay attention to it, as honey tends to foam when boiling. Then you add a bit of the spices that are typical for these sweets. I remember my mother adding mainly cinnamon sticks and whole clovers, but since I started making my own in the Netherlands, I have been using the ready speculaas mixture. This is similar to the pumpkin pie spice in the US or the mixed spices in the UK. I add about half a teaspoon of this spice mixture. Let it boil for a few minutes till it looks homogenised and then remove it from the fire and let it cool down.
For the cookies add oil, margarine, the orange juice and zest, the sugar, the spices and the cognac in a bowl and mix them with a wooden spoon a bit. In another bowl mix the flour with the baking powder and the baking soda and add it in portions to the liquid mixture. Continue mixing with the wooden spoon for as long as you can. If it gets difficult, use your hands. In general, the dough is an easy one. Because of the big quantity of oil it is not sticking and it is easy to work it even without really putting your hands inside. You should never use a mixer for these cookies and you should keep in mind that if you over-work the dough the oil will not get integrated to the dough. As a result, they will be dry when they get backed. The dough is ready when it is a nice, bit oily mass. If it is too dry, add some more oil or if it is too oily still add some flour.
When it is ready, you should work with it directly. Don’t let it rest for long, or the oil will precipitate. You can either create small egg-shaped cookies with your hands, or cut it in different shapes. This year, I decided to make them in stars myself. They don’t grow while cooking, so you don’t have to worry about the spacing.
They get cooked for 20 – 25 min in a preheated oven at 180 C fan. They are ready when they start getting a bit brownish. Before taking them out, prepare your syrup and a tray to put them on. Carefully, put one by one the hot melomakarona in the cold syrup. I leave them only about one minute from one side and one from the other. At my home we don’t like them if they are too sweet and if you leave them too much they break inside the syrup. You have to find how you like them yourself, so try a couple of them, to figure out how sweet you want them. Remember that the warmer the cookies, the faster they absorb the syrup, so if they are cooled down a bit, let them a bit longer inside.
When you put them on the tray you can sprinkle them with the walnuts.
If you are Greek or from the Balkans there is a high possibility you know this dish already. Nevertheless, I find it an interesting topic to include in my newest category: cooking.
I am Greek in origin, but by now I have been living almost 10 years abroad. One of the things that most Greeks abroad miss is the weather (oh well!) and the food, but the latter can be solved if you cook at home. Upon request from my husband, last week I decided to cook Imam bayildi.
Let’s start from the name. It is really turkish and it means that the imam (their priest) fainted or something like that. The story goes that an imam liked the dish so much, that he ate really a lot and as a result he fainted.
Concerning the dish, the main ingredient of Imam bayildi is aubergines. In short it consists of aubergines with tomato sauce and onions. It is a dish of our cuisine in the category we call “ladera”, which means oily. This category includes dishes that are based on vegetables and don’t have any meat.
In Greece we use the different types of aubergines for different dishes. For Imam bayildi we use the long light purple ones and not the short and fat deep purple ones that are common in western Europe. Unfortunately, for my dish, I couldn’t find the correct aubergines, so I had to make do with the second type.
Long light purple aubergines used for Imam baildi
Short, fat aubergines used in moussaka
Imam bayildi is a dish we used to have at home quite often, as my dad loves aubergines. I remember my mother cooking this dish: in a big pot she was first letting the onions saute and then she added the tomato sauce and the aubergines. She was letting it cook for quite some time, till the aubergines almost dissolve in the sauce. But since my mom died a few years ago, I couldn’t really call her to verify the recipe. Instead, I checked Akis Petretzikis. He is a young greek chef, whose recipes I have tried several times and they are nice! He bases his cooking in the greek tradition, but with a bit of a modern touch. As a result, he cooks his Imam bayildi in the oven and not in the pot, thus diminishing the amount of oil the vegetables absorb. Perfect for my husband and me!
As I mentioned already, I couldn’t find the correct aubergines, but I tried to choose four “common” aubergines that were rather long than short. I washed them and removed the green non-edible part and then followed Akis’ recipe. I made three cuts in each one of them and opened the cuttings, and then I spiced them with salt, pepper, thyme and added a bit of oil.
My aubergines ready to go in the oven
In the meanwhile the oven should be preheated to 180 C. The recipe advises to cook the aubergines in the oven like this for 40 min. Since I had the wrong type of vegetable and mine were a bit thicker, I left them cook for at least 45 min.
While the aubergines were in the oven, I prepared the filling: one onion and one clove of garlic per aubergine, cut in slices. In a pan I added a bit of olive oil and let the onions and garlic saute in high temperature. I added the seasoning that the recipe suggests: one tablespoon of sugar, a lot of cumin (I absolutely adore this spice), salt and pepper. Slowly slowly, the onions start to caramelise and get a really nice colour.
Don’t they have a beautiful colour? You should check the smell too!
Once they looked ready, I added the sauce parts: one tablespoon tomato paste and then a tin of chopped tomatoes. I stopped the cooking when most of the liquid had evaporated.
The finalised filling
In the meanwhile the aubergines finished cooking for 45 min. I tried them and they felt soft enough, so I started the assembly. I pressed the cuts down with a spoon and then added the filling in the dents created and on top sprinkled a bit (or a lot really) of feta cheese. Of course it can be eaten without the feta cheese, but according to my experience ladera without feta are boring! Then the pyrex went back to the oven for another 15 to 20 minutes.
Unfortunately, as it was already dark when my Imam got ready, this is the photo from the second day we reheated the aubergines, so feta got a bit more colour.
Akis suggests to serve the aubergines on rocket, but we chose to serve it with salad. My husband said he loves me a bit more after eating dinner 🙂
At our home we are cooking a lot and we are influenced by both our countries of origin, as well as the countries we have been living in. There are several things I like about the Swiss cuisine, which is much more varied than what is known abroad. Everybody knows fondue, right? Anything else?
Wurstsalat
Today I would like to explain one of my favourite summer dishes I learnt from my mother-in-law: Wurstsalat. It means sausage salad and I have found it in Germany and around as Swiss salad.
All the ingredients of the Wurstsalat
For four portions, all that is needed is:
4 Cervelats (sausages)
2 onions
150g Emmentaler mild cheese
4 Boiled eggs
Some pickled cucumbers
Cervelats are a typical kind of sausage of Switzerland and can be found in France and Germany as well. The recipe of them depends on the region, but generally they taste similar to a frankfurter, but with a smokier flavour. They are short and fatter compared to frankfurters. In Switzerland, they are usually made by roughly equal parts of beef, pork, bacon, pork rind and ice. They are considered the national sausage in Switzerland!
Small and fat cervelats
We cut the onions in half-rings, the eggs and pickles in rings and the cheese in small cubes. The sausages are first skinned and then cut in the middle and in slices. They are all mixed together in a bowl.
The sauce is an important part of any salad. For the sauce of the Wurstsalat, we use:
4 spoons vegetable oil, but not olive oil
2 spoons white vinegar, but avoid balsamic vinegar
2 spoons mayonnaise
salt and pepper according to will
It is important to avoid olive oil and balsamic vinegar, as they are too strong in taste for this salad. I use peanut oil and herbal white vinegar. All the ingredients of the sauce are mixed well and then it is added to the rest of the ingredients.
As I mentioned already, it is a summer dish, usually for lunch. For Swiss, the main dish of the day is the dinner, so lunch needs to be light. It is a fast recipe and the dish has such a fresh and light taste, perfect for a hot summer day! And you have to excuse the fact that my photos are too bright, but this summer has been amazing!
Oh autumn is already here! The weather is a bit cooler, the leaves are starting to turn brown and some of the typical autumn fruits got mature. Last week was the time of grapes!
My parents-in law have a beautiful vine tree spanning over a small type of pergola. In winter it is nothing impressive, but in spring it comes in life, becoming totally green with leaves. And at this period there are nice dark grapes hanging down!
Isn’t it beautiful?
Last weekend we were visiting our parents, so they asked for our help to make grape juice. They had bought a nice looking manual fruit press for this purpose and last Sunday was booked for the family activity. Even the weather was good!
The nice looking manual fruit press assembled
We started with collecting the grapes, throwing the parts that didn’t look good and taking the edible grapes away from the stem. We didn’t want to put them with the green parts in the press. In the meanwhile, the press was screwed on a piece of wood in order to increase its stability and was assembled.
The fruit ready to go in the press
Once the press was full, the juice production started! Admittedly, it needed quite some pressure to extract the juice from the grapes!
A family activity!
With every batch we were pressing, we optimised the process. So we concluded that it was easier to fully extract the juice if the press was half full and not filled to the top. In addition, we noticed that if the net was as in the pictures, the grapes were escaping from the top, so we folded the net-bag and then added the wooden parts on the top.
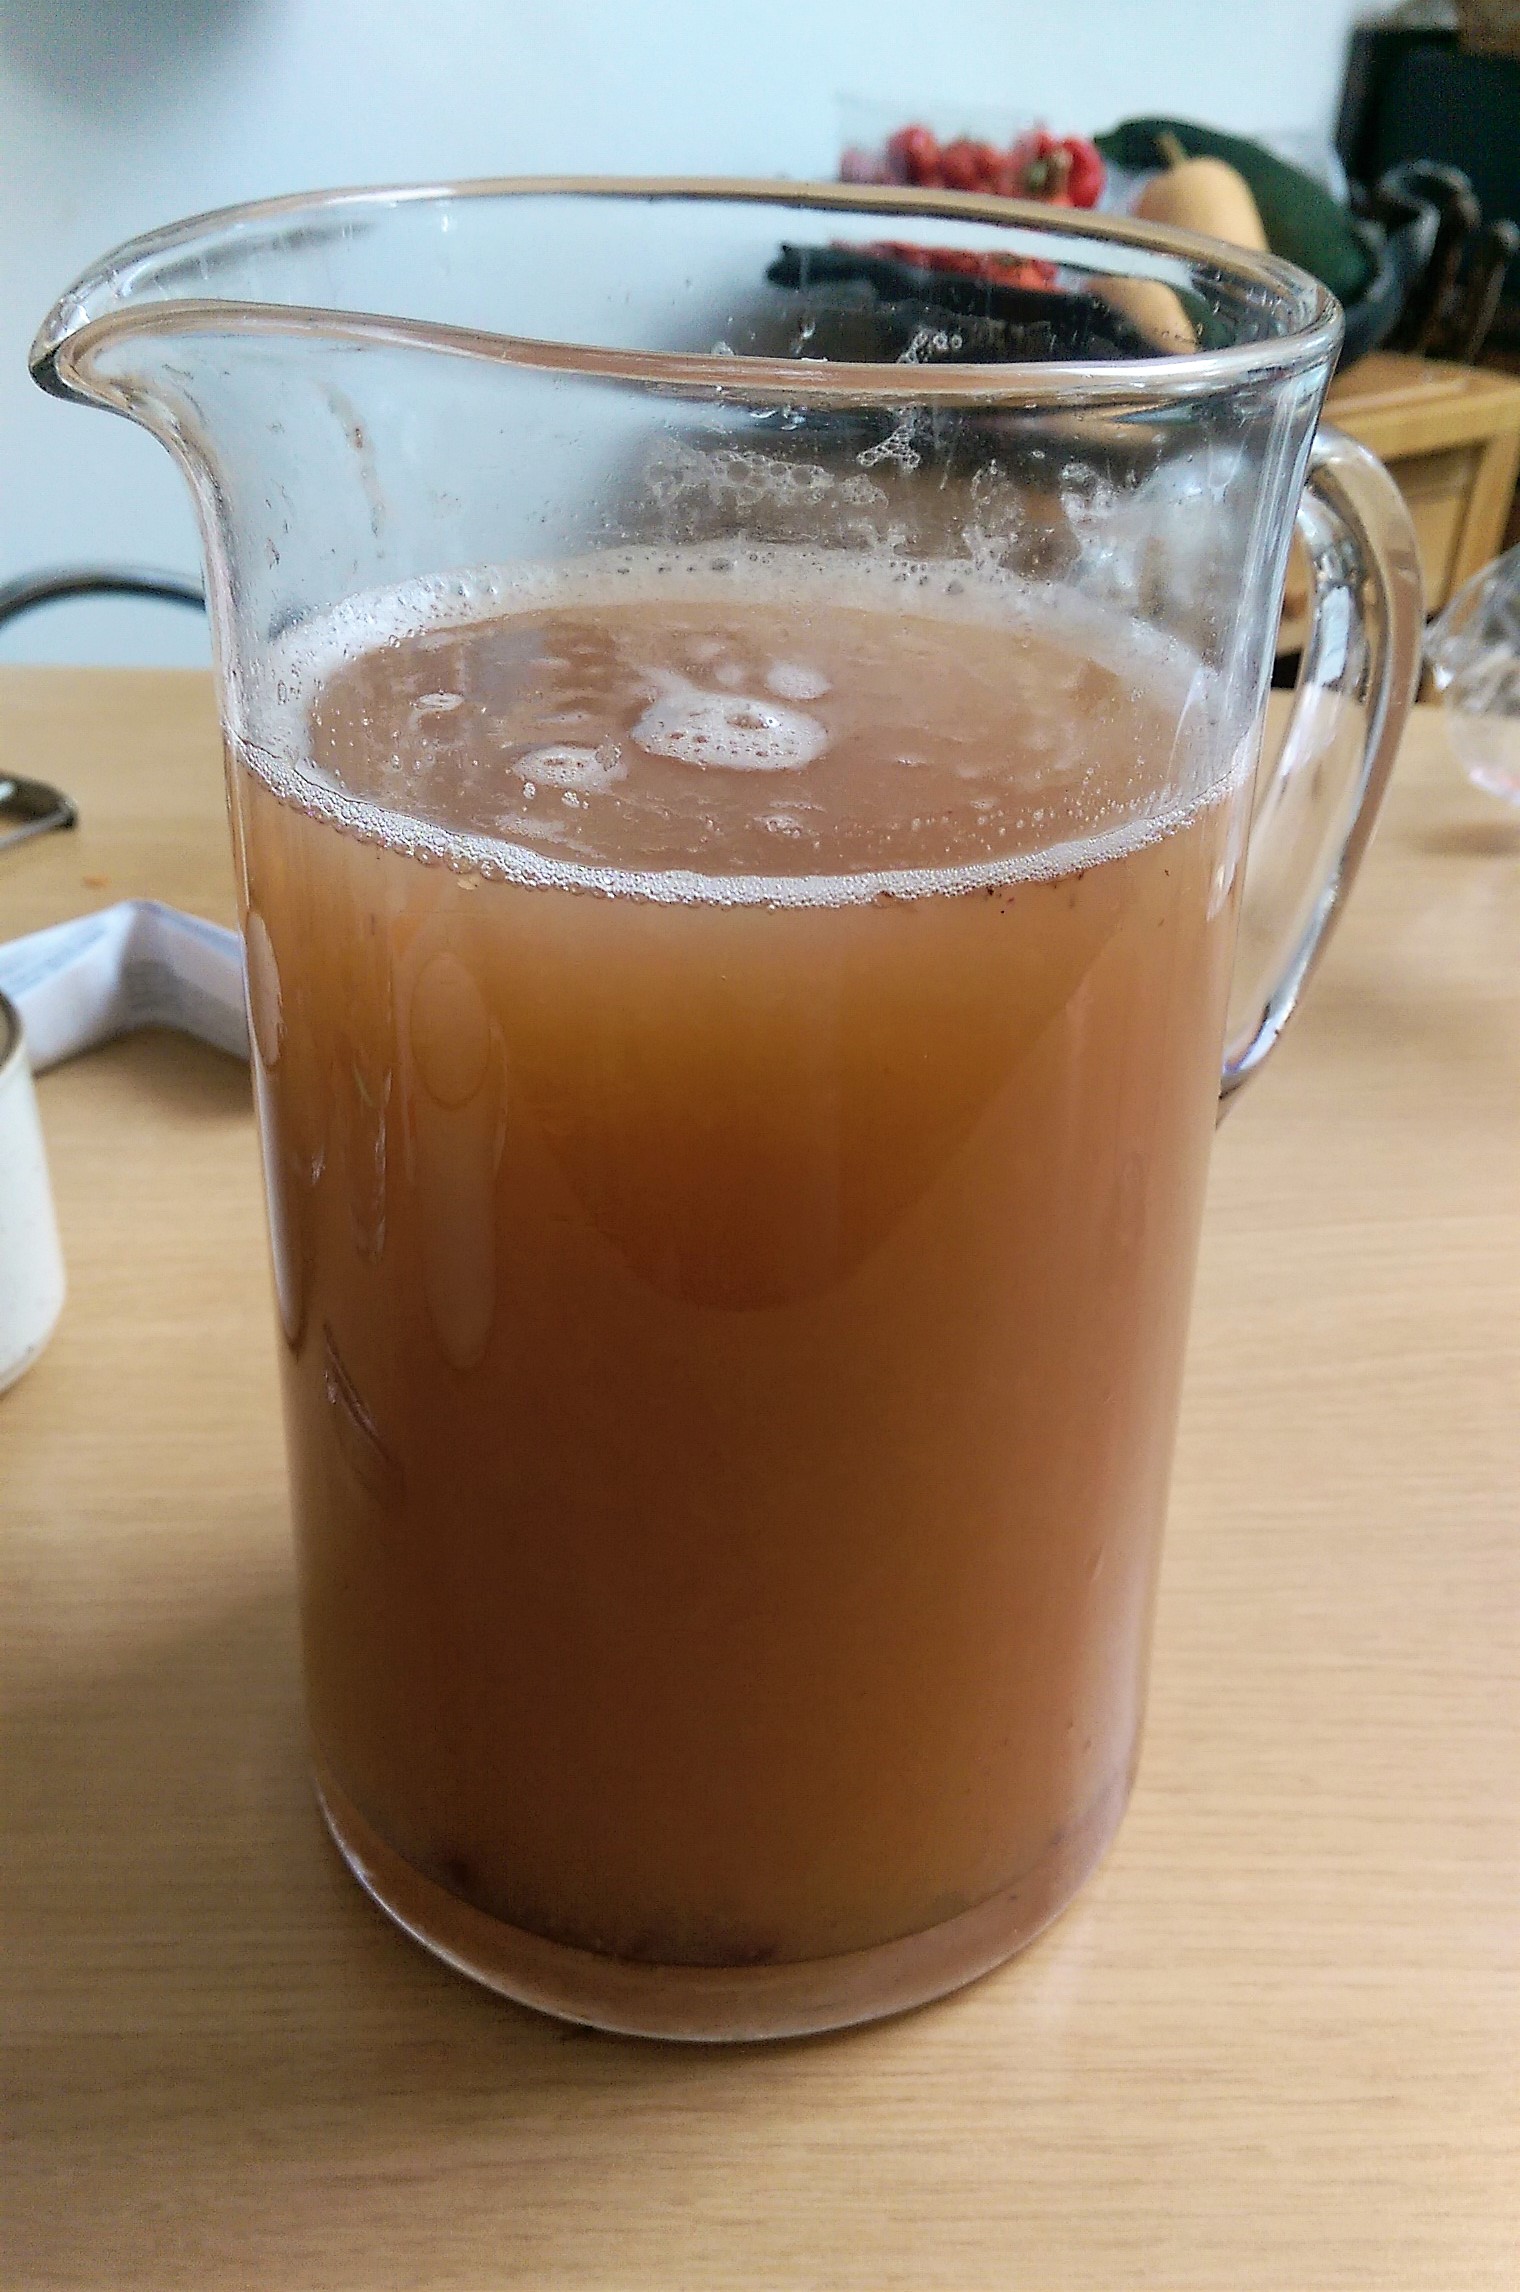
The juice is being collected
We did try the juice ever since the first extract. It tastes nice and it smells amazingly! Just fresh juice without any additives or sugar! Nature in its best!
The result of our work!
So this week we are drinking a lot of grape juice!
This is a big day! Finally after almost two months I am writing again from the desktop computer! I am almost finished with unpacking and setting up our new home, so today I finally have time to tell you about the new jam we made in the beginning of August!
Remember in May that we made elderberry flower syrup and jam? Especially the jam was such a success! Everybody around liked it quite a lot. It has a light refreshing and not too sweet taste.
After a really nice and quite warm summer, the rest of the flowers we did not cut to make syrup or jam have turned to nice dark coloured berries. So last Sunday my mother-in-law suggested we make some elderberry jam!
Look at the nice dark red to black colour the berries have!
The procedure is quite easy. First we collected a satisfactory amount of berries. They need to be dark coloured, which means they are ripe and ready for the jam. Unfortunately they can’t be eaten raw, as they are a bit sour.
Then we removed the berries from the small stems they hang from. This was the most tedious part of the preparation, but with the help of a fork the work is easier done. And don’t worry about some small stems or unmature berries.
Removing the berries from the stems
All the berries in the pot. Even if there are a few not totally mature inside, it doesn’t destroy the taste of the jam. And don’t worry if a few small stems are also inside.
Once we had all the berries collected in the pot we were ready to start with the jam. They need to be boiled with water, so as to give their juice. The volume of water added is half the weight of the berries. So in our case we had 1.4kg berries and we boiled them with 750ml water. Let the water boil until the berrie burst, then turn the heat off and let it cool down.
Let the berries boil and turn off the heat. The liquid has a really nice red colour!
The next step involves putting the juice and berries through a sieve so that only the liquid is collected. This is exactly why it was not important to remove absolutely every small stem. It should be noted though, that you should not press the berries in the sieve so as to collect more. That would just result in making the final jam bitter. The berries have given what juice is to be used for the jam while bursting from boiling.
Extract only the juice without pressing the berries. Attention as it might be quite hot, as in our case.
And finally the last step of the jam: We have to boil the juice together with jam sugar. For 5dl elderberry juice we need 300g jam sugar. We first add half of the sugar with the juice and boil it for 2 minutes, then we add the other half of the sugar and boil another 2 minutes. Gentle mixing is important during all this procedure.
The jam is ready when once you pour a small quantity on a clean plate and let it cool for a moment, it is viscous enough to hold the plate vertical and the jam to run down really slowly, as we did in the elderberry flower jam.
In the meanwhile the jars were washed with hot water and they are filled with the warm jam, while they are still warm themselves, and turned around so that that they close air-tightly.
The jars filled with the warm jam and turned around so as to get sealed airtight
By now we have tried it and it is really nice too! It has a bit heavier taste than the flowers, comparable to any other berry jam. It has been such a successful year for homemade jam production!